About Us
I have been longarming since 2010.
I have been quilting since the bicentennial and can honestly say I am happiest when I have my machine fired up and I'm bringing a new quilt to life. With clients' quilts coming and going, it's like having a quilt show every week in my own home.
My machine will handle quilts as large as 124" and my turnaround time is fairly short, so please contact me if I can help you in any way.
One word of caution. If you are allergic to dogs, you might consider a different quilter. I occasionally pet sit dogs in my home.

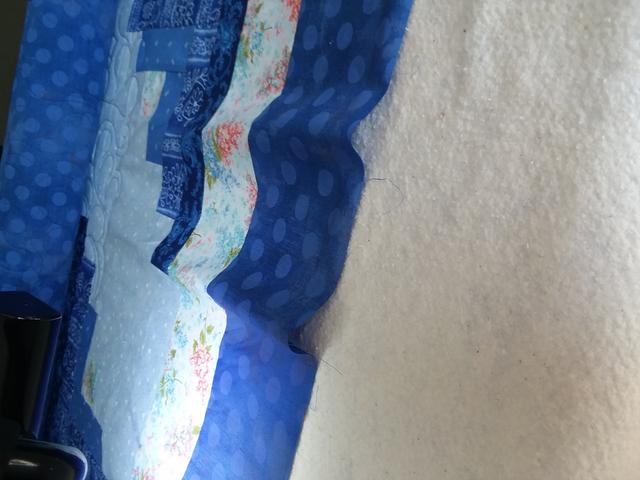
A word or two (many more, actually) about BORDERS. The photo to the left shows what happened when I sewed two 65" pieces of fabric together for a backing without pinning. I even used the walking foot on my Pfaff and yet the two came out a full inch off.
So guess what happens when you add a border to a quilt top without taking some preventive measures (pun intended)? Your border will be a little wavy at best, and a ruffle at worst. It's almost impossible to work out the waves and the resulting puckers can ruin the look of the quilt. Often, I have to steam and starch a border extensively to shrink it up a bit, and that usually only works on fabrics that have not been prewashed. Or, I have to take a tuck and hand-stitch it down.
I recommend that you watch this youtube video: https://www.youtube.com/watch?v=C_SEZo6hEBI. There are several videos that show techniques for borders, so find one that works for you. And unless you need to piece your border strips together at an angle, like the way you join bindings, don't do it. That just gives one more place for stretching to occur.
I know it's exciting at the end of making a quilt and you just want to get it done and off to be quilted, but taking time in the border process will pay off and give you a straight, flat quilt. And your longarmer will keep all of her/his hair.
And those wonderful PANELS we all love are rarely squared up. Take a few minutes to check before sewing them in, especially if you're using them in the backing. Pleats form when the panel is "fluffier" than the surrounding fabrics.